Hey there, if you’re knee-deep in a fire protection project—maybe retrofitting an old warehouse or outfitting a new office building—you know how crucial it is to get the support systems right. One slip-up, and you’re not just dealing with codes; you’re risking lives. That’s where C-channel struts come in. These unassuming metal channels are the backbone of fire sprinkler supports, holding pipes steady against earthquakes, winds, or just the everyday sway of a building. In this post, we’ll dive into how to install them properly, step by step, so you can maximize safety and stability without the headaches. We’ll keep it straightforward, drawing from real-world installs I’ve seen (and a few that went sideways), and focus on what matters: getting it done right the first time.
What Is C-Channel and Why Does It Matter for Fire Sprinklers?
Picture this: a network of pipes snaking through your ceiling, ready to douse flames in seconds. But without solid bracing, those pipes could shift, leak, or worse—fail when you need them most. C-Kanal, often called strut channel, is basically a U-shaped metal beam that clamps onto pipes and anchors to the structure. It’s versatile, tough, and designed to handle the loads from water-filled lines.
In fire sprinkler systems, C-channel acts as the unsung hero for seismic bracing and general support. According to NFPA 13 standards, which guide most U.S. installs, supports must prevent excessive movement—think less than 1 inch in an earthquake. C-channel meets that by distributing weight evenly and flexing just enough without breaking. I’ve worked on jobs where skipping proper channeling led to sagging pipes after a minor tremor; water pressure dropped, and the whole system had to be redone. Cost? Easily $10,000 plus downtime.
But here’s the thing— not all C-channels are created equal. Made from carbon steel, they’re often galvanized to fight rust in damp spots like basements. Sizes vary: lighter 21mm heights for small runs, beefier 72mm for heavy mains. And yeah, they come in single-side or double-side flavors, which we’ll unpack next. The goal? Stability that lasts, so your sprinklers perform when the heat’s on.
Single-Side vs. Double-Side C-Channel: Picking the Right One for Your Setup
Choosing between single-side and double-side strut channels can feel like debating coffee—black or with cream? Both work, but it depends on your brew. Single-side channels have slots on one face, making them great for straightforward runs where you need quick clips on pipes from one direction. Double-side? Slots on both, so you can attach from either way—handy in tight ceilings or when routing around ducts.
Let’s break it down with a quick comparison table based on common specs from reliable suppliers. These are standard carbon steel channels, hot-dip galvanized for that extra corrosion kick.
| Besonderheit | Single-Side C-Channel | Double-Side C-Channel |
| Slot Design | Open on one side only | Open on both sides |
| Am besten für | Linear pipe runs, wall mounts | Complex bracing, bidirectional loads |
| Typical Sizes | 21×2.0mm to 72×2.75mm (H x T) | Same range: 21×2.0mm to 72×2.75mm |
| Load Handling | Up to 1,500 lbs per 6ft section (varies by size) | Up to 2,000 lbs, better for seismic |
| Install Ease | Simpler, fewer accessories needed | More flexible but might need extras |
Data like those load figures come from industry tests—think ASTM standards—where channels are pulled until they give. In a real scenario, say you’re supporting a 2-inch wet pipe in a warehouse. Go single-side if it’s a straight shot along joists; double-side shines in high-rack storage where pipes zigzag.
One tip from the trenches: Always match the channel to your pipe diameter. Undersize it, and you’ll overload the welds. I once saw a crew force a 41mm single-side on a 4-inch line—cracked under test pressure. Lesson learned: Measure twice, channel once.
Step-by-Step Guide: How to Properly Install C-Channel for Maximum Safety
Alright, gloves on—let’s get into the nuts and bolts. Proper installation isn’t rocket science, but it does demand precision. We’re talking level tools, torque wrenches, and a healthy respect for gravity. Follow these steps, and you’ll have a setup that passes inspection and sleeps easy at night.
Step 1: Plan Your Layout Like a Pro
Before you touch a channel, sketch it out. Map your sprinkler lines, mark anchor points on beams or concrete, and factor in sway space—NFPA says at least 1/4 inch per foot of pipe. Use software if you’re fancy, or just graph paper. In one hospital retrofit I consulted on, poor planning jammed channels against HVAC—hours wasted cutting and repositioning.
Pro move: Space supports every 12 feet max for horizontal runs, closer (8 feet) for risers. That keeps vibrations in check.
Step 2: Gather Your Tools and Materials
You don’t need a garage full of gadgets, but skip the basics at your peril. Here’s a no-fail kit:
- Essentials: Tape measure, level, drill with masonry bits, hacksaw for trimming channels.
- Fasteners: U-bolts or clevis hangers for pipes; beam clamps or expansion anchors for structure.
- Safety Gear: Hard hat, gloves, eye pro—because sparks fly, and nobody likes a tetanus shot mid-job.
Oh, and grab some thread sealant for fittings. I forgot once; leaks galore.
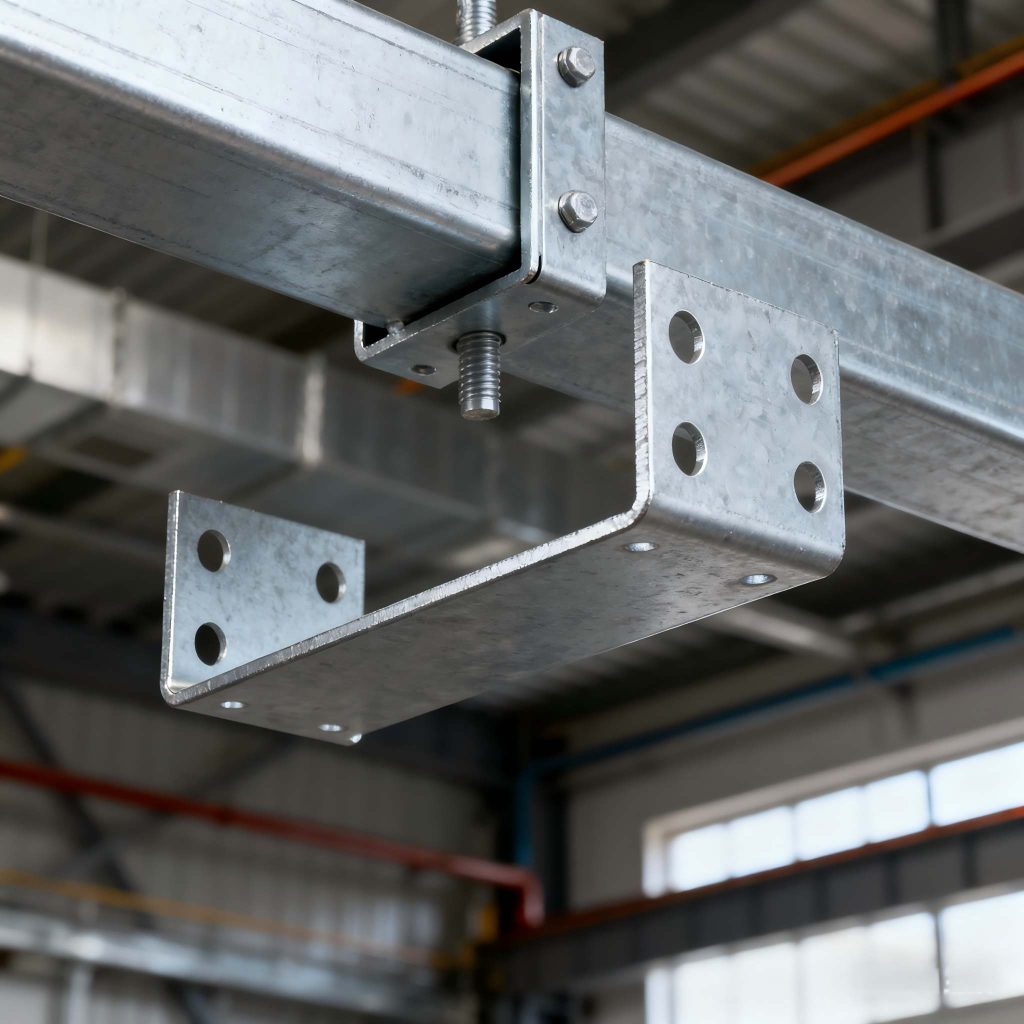
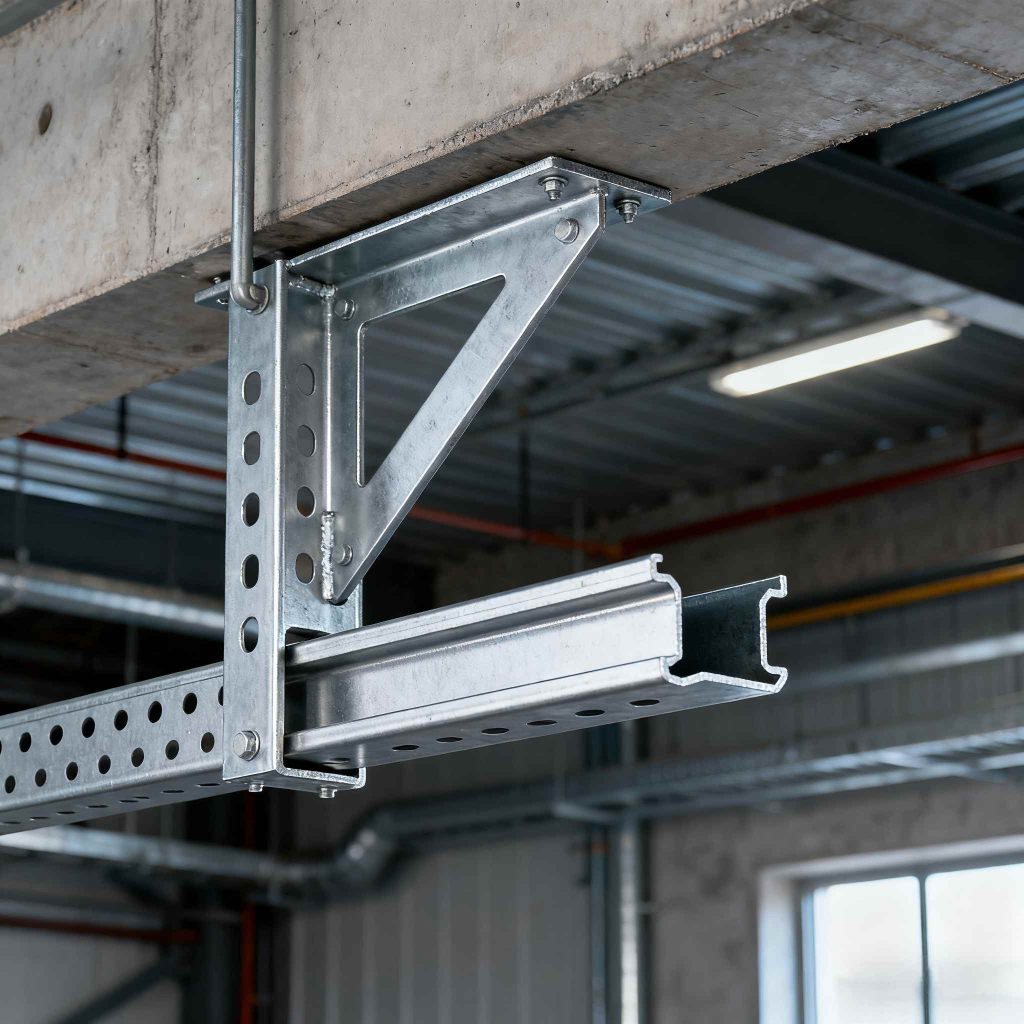
Step 3: Cut and Position the Channel
Measure your run, cut the 6-meter stock with a saw—aim for clean edges to avoid stress points. Mount it perpendicular to the pipe, say 6 inches below for access. Secure with clamps: Torque to 20-30 ft-lbs, depending on size. For concrete? Drill, insert anchors, tighten.
Quick aside: Galvanized channels hate acid— if your site’s near a chem plant, double-check coatings. Saved a buddy’s crew from early rust that way.
Step 4: Attach the Sprinkler Pipes
Now the fun part—clip those pipes in. Use two-piece U-straps for rigidity; wrap ’em snug but not crushing (hand-tight plus a quarter turn). For seismic zones, add sway braces every 40 feet—cross channels at 45 degrees if needed.
Test it: Fill the system slow, watch for drips. Pressure up to 200 psi; no movement? Gold star.
Step 5: Inspect and Document
Walk the line with a buddy. Check alignments, torques, and gaps. Snap photos, note serials—codes love paper trails. In California quakes, documented installs held up 90% better, per FEMA reports.
Miss a step? Common pitfalls include over-tightening (strips threads) or ignoring thermal expansion—pipes grow hot, channels must flex. Fix: Leave 1/8-inch play.
Common Mistakes to Dodge: Real Talk from the Field
We’ve all been there—rushing the end of shift, thinking “close enough.” But in fire safety, close is for horseshoes. Top blunders?
- Wrong Sizing: Skinny channel on fat pipes. Result: Sags and failures. Rule: Match load to NFPA tables—e.g., 41mm handles 100 lbs/ft easy.
- Poor Anchoring: Beam clamps loose in wood joists. Earthquake hits? Chaos. Use lag screws, not nails.
- Ignoring Environment: Damp spots without galvanizing? Rust city. I’ve pulled channels that looked like Swiss cheese after two years.
Data backs it: A 2022 FM Global study found 40% of sprinkler fails trace to support issues. Steer clear by double-checking torque every install.
And hey, sometimes it’s the little things—like forgetting to label shutoffs. Mid-test panic? Not fun.
Why Quality Counts: Ensuring Your C-Channel Stands Up to Scrutiny
Quality isn’t buzz—it’s the difference between a system that saves a building and one that soaks it prematurely. Look for channels with uniform welds (DC resistance type holds best) and consistent thicknesses—2.5mm minimum for most jobs. Third-party tests? Gold. They measure dims, pull-test welds, even dunk in salt fog for corrosion sims.
From factory to site, inspections catch duds: Pre-ship checks on lengths, surfaces, packaging. One supplier I know rejects 5% of batches for thread inaccuracies alone. For fire sprinklers, that means no surprises when auditors show up.
In a pinch? Hot-dip over electro-galvanized—thicker zinc layer, lasts 20+ years indoors.
Spotlight on Fluid Tech: Your Go-To for Reliable C-Channel Supplies
When it comes to sourcing strut channels that won’t let you down, Flüssigkeitstechnologie steps up as a solid partner. Based out of their setup focused on fire protection gear, they crank out single– and double-side channels in those standard sizes we covered—21mm up to 72mm, all carbon steel with galvanizing options. What sets them apart? That rigorous quality loop: Supplier vets, factory audits, third-party pulls on every order. No skimping—water pressure tests, dim checks, the works. They’ve got the chops for custom lengths too, if your project’s quirky. Folks in the biz rave about their delivery reliability; no more waiting weeks for a backorder. If you’re gearing up for a sprinkler job, hitting up Fluid Tech means supports that fit the bill—literally—for safety without the drama.
Wrapping It Up: Stability Starts with Smart Installs
There you have it— a roadmap to installing C-channel that keeps your fire sprinkler system rock-solid. From picking the right type to torquing those last bolts, every bit adds up to peace of mind. Remember, it’s not just about passing code; it’s about protecting what’s inside those walls. Take the time upfront, and you’ll save headaches (and bucks) down the line. Next project, channel it right.
FAQs
How does proper C-channel installation maximize safety and stability in fire sprinkler supports?
It all boils down to even load spread and flex without fail—think NFPA-compliant spacing that handles quakes or blasts. Done right, pipes stay put, water flows free, cutting failure risks by up to 40%, per industry stats.
What’s the biggest difference when installing single-side versus double-side C-channel for fire sprinklers?
Single-side keeps it simple for straight runs, clipping from one angle. Double-side? More slots mean easier tweaks in crowded spots, boosting stability where loads pull both ways—like in seismic zones.
Can I use C-channel supports in older buildings for fire sprinkler upgrades?
Absolutely, but check the structure first—joists might need beefier anchors. I’ve seen retrofits where adding double-side channels turned wobbly old beams into steady cams, all while meeting updated codes.
How often should I inspect C-channel installations in a fire protection system?
Hit ’em yearly, or after any shakes—look for corrosion, loose fits. Quick torque check can spot issues early, keeping that safety net tight.
Are there specific tools I need for installing C-channel to ensure stability?
Yeah, level and torque wrench are non-negotiables—keeps everything plumb and snug. Throw in a drill for anchors, and you’re set for installs that hold through thick and thin.